Install, connect, and check desktop audio
On this page
- Install and make the first start
- Connect to a radio through this computer's Core
- Connect to another computer's Core
- Inspect a saved Core and the actual connection path
- Start a Core service on this computer
- Choose this computer's receive and transmit audio routes
- Choose audio quality for this window's Core connection
- Choose whether a saved target connects at startup
- Recover a lost connection
This chapter gets the desktop client to the intended radio and confirms that receive audio and a microphone route exist. It covers the radio target for this window and audio devices attached to this computer. To host a Core for phones or another desktop, see Share a Core with other devices. For transmit setup and a controlled on-air check, continue to Set up and transmit.
Install and make the first start
Download the package matching your operating system and processor from the NereusSDR releases page, and use that release's notes for package-specific requirements. On macOS, install from the DMG or PKG and launch NereusSDR from Applications. On Windows, run the x64 installer or extract the portable ZIP and keep its files together. On Linux, make the AppImage executable and launch it. If a platform's package manager or security prompt blocks launch, resolve that operating-system prompt before diagnosing radio discovery.
The first local launch may show NereusSDR: FFTW Wisdom while it creates optimized DSP tables. Allow this one-time work to finish; closing the application interrupts startup and the next launch may repeat it. The wisdom cache is local to this computer. It is not a radio setting and does not travel with a saved radio entry. If a later release changes the DSP build, a new wisdom pass may be needed. First-start time varies with the computer, so the progress display is the readback; there is no fixed completion time to promise.
Before connecting, power the radio and attach it to the network. A local desktop needs network reachability to the radio. A remote desktop needs reachability to the Core computer, while that Core computer needs reachability to its radio. The desktop's Connections picker chooses this window's target; it does not start the Core service on another computer. Open it through Radio > Connections… in a picker-managed window. Windows using the local radio panel call that command Manage Radios…; a dedicated remote window can instead open This Core. The connection procedures below use the picker name where applicable.
Connect to a radio through this computer's Core
- Open Radio > Connections…. This opens the Connections picker. In a normal local window, its This computer's Core row means that the local Core is selected as the operating context; it is not itself a radio. Select a radio under Radios on this network. If the list is stale, press Scan and wait for discovery to refresh.
- Select the radio row and press Connect. If the model or address is not discovered, use Add Radio…, enter the radio address and model requested by the editor, save it, then select the saved row and connect. Check the address and model against the radio/Core information you have; a saved row is only a target record, not proof that the endpoint is reachable.
- Read Current connection in the picker. It should identify the connected radio and say the window is connected using this computer's Core. Close the picker and wait for the panadapter trace to update. Open RX or select the active VFO's audio controls and unmute a suitable output; a moving spectrum alone confirms data, not that the selected speaker is audible.
Some desktop windows present Connect to Radio directly instead of the full picker. In that dialog select a row under Discovered Radios, use ↻ Scan to refresh, or choose Add Manually... to enter a target, then press Connect. The dialog's own Connected state is the readback. Follow the labels actually displayed by the window.
The selected target is saved so the application can reconnect to it. If you need a different radio, reopen Radio > Connections…, select the other row, and connect. Use Edit… to correct a saved target and Forget… to remove a saved entry you no longer use. Forgetting removes the saved target from this computer's picker; it is not a factory reset of the radio. Do not use the standalone Radio > Connect action to choose a different target: in an ordinary local window it reconnects to the last-used saved radio. Radio > Disconnect ends the current radio link. In a picker-managed window, Connect opens the picker workflow.
Connect to another computer's Core
Use this route when another computer owns the radio connection and DSP. In Radio > Connections…, select a paired Core under Your Cores, or choose a nearby entry under Cores on this network. The selected row's action may read Connect or Pair. For first-time pairing, use Add a Core by code… and enter the code shown by the Core, or Type an address… when you were given a network address. A pairing code is an enrollment credential; enter it only for the Core you intend to trust.
After pairing, select that Core and press Connect. Confirm its name and connection state in Current connection before operating; the radio is remote through that Core. Later, Radio > Connect in a dedicated remote window reconnects the window's Core target. Reopen Connections… when choosing among saved targets. Radio > Disconnect leaves the Core session. A connection attempt can fail even when the target is saved: verify that the Core is online, the address/path is current, and that the Core has remote access enabled. Retry from the picker after correcting reachability rather than repeatedly changing the radio's saved identity.
In a dedicated remote window that retains Radio > Manage Radios…, that command can open the This Core radio-management page. Change radio…, Edit radio…, and Forget radio there affect the radio configured on that Core, rather than this computer's local radio list. A change to the radio attached to a shared Core changes the station endpoint for its connected operators. The action can be held while transmitting, while a Core change is busy, or when the Core does not offer that operation; read the reason displayed by the page and resolve that condition first. Reconnect the window when the page says a Core radio change requires it.
Inspect a saved Core and the actual connection path
Open File > Settings… > Cores > Your Cores, or select a saved Core in
Connections and click Manage…. This is the Core Settings area. Selecting
an entry for inspection does not connect this window or change its target.
The selected Core has Overview, Addresses, Radio and Devices tabs.
- Select the intended saved Core and read Overview > Connection in this
window. Status tells you whether this window is connected to that Core.
Reached through, Controls, Audio and display, Core listener IP
and Radio report the available current-session facts. Controls and media
may use different paths. A retained address is a candidate for a connection,
not proof of the path currently in use.
- Open Connection details… or Diagnostics… for this window's live
connection evidence. Audio with the Core… also concerns this window's
current Core, even when the saved entry being inspected is a different Core.
Check that context before changing audio quality.
- Use Radio and Devices to administer the inspected Core only when this
window is connected to it. Otherwise these tabs explain why their actions
are unavailable. Changing its radio restarts the station connection and
affects connected windows/devices; coordinate first and wait for reconnect.
Retain a direct address for a paired Core
Use this when the already paired Core has a reachable listener on a LAN or VPN,
or its known listener address has changed. It is separate from adding or
pairing a different Core.
- Select the saved Core, open Addresses, then choose Add address….
Enter Hostname or IP address and Core connection port, using the
Core listener's details. IPv4, hostnames and IPv6 are accepted; IPv6 can
be entered with or without brackets. The radio's IP and the RV service's
address are different endpoints.
- Click Add and wait for the identity check. The address is saved only
when the answering endpoint is verified as this paired Core. A refusal
leaves it unsaved; correct the address/port and use the offered Retry.
- Confirm it appears under Added by you. Up to four manual addresses can
be retained. Previously worked is a separate successful-connection
history of up to four; Supplied by the Core is its reported inventory,
which may contain addresses this computer cannot reach. One row can carry
several of these labels.
- Changes apply to future connection attempts. They do not switch the current
connection or mark a newly retained address as previously successful.
When ready to reconnect, use Connections, select this Core and verify
Overview again after it connects.
Use a manual row's Edit… to correct it. Remove asks to remove its manual
retention; the same address can still remain in the automatic sources. Read
the confirmation, then verify the row's labels. Removing retention does not
terminate this window's connection or revoke its pairing.
Rename the Core for all devices
In the selected Core's Overview, choose Rename Core…. Enter the callsign
and optional /name using the characters and length described beside the
field, then press Save. This changes the name on the shared Core. It is not
a private alias on this computer.
Wait for acceptance and check the displayed name. The desktop can use an
eligible existing authenticated session or a temporary sign-in to a reachable
paired Core. It needs this computer's existing device key; the page explains
missing pairing/key, incompatible administration, a connection retry or a
rename session still closing. Cancel or correct the reported condition before
retrying. If the Core accepted the name but saving its local presentation failed,
follow that message and verify the actual Core name rather than issuing a
second rename merely because the saved label has not caught up.
Start a Core service on this computer
To host a local radio for phone/tablet clients or remote desktop clients, connect this desktop to the local radio first, then open File > Settings… > CAT & Network > Remote Access. Under Core on this computer, enable Run a Core on this computer. The Core section reports the Core name and reachability. Keep it running when NereusSDR is closed and Start it with the computer control the service lifecycle beyond this application session; enable them only when that persistent behavior is intended. The Connections… button on this page only opens the target picker. It does not enable the Core.
Use Rename to give the Core a recognizable station name. For phone enrollment, use Add a device or provide the current pairing code shown on the page. Codes rotate and should be read from the current Core page. Paired devices lists enrolled devices; Connected now reports active sessions. The key-backup section gives its own file location and I've backed it up acknowledgement. Follow the displayed backup instruction and store that Core key safely: ordinary desktop settings export is not a substitute for a Core key backup. If the Core controls are disabled, the page states why, for example that no local radio is connected, a Core change is in progress, or the station is transmitting. See Core sharing and device management for pairing, ownership, and revocation procedures.
Choose this computer's receive and transmit audio routes
Open File > Settings… > Audio > Devices. Under Speakers, choose the playback device for receive audio. Enable and choose Headphones only when you need a separate headphone destination. These are this computer's output routes; they do not choose a radio input or alter another connected device's output. Check Negotiated for the format the audio engine actually opened. If the route is silent, check the device's OS volume, application mute, and the selected slice's audio mute before changing radio controls.
Computer playback and microphone capture are separate from the radio's speaker/headphone path. This computer's master volume controls its own output; the radio output follows its supported slice-audio/monitor controls.
Under TX Input (Microphone), select the computer capture device when using PC Mic. The page reports capture status and provides Retry microphone if the stream failed. If the device is missing, first check operating-system microphone permission, then reselect the device and retry. This confirms capture at the computer; it does not authorize the Core to transmit. The mic source itself is selected separately at File > Settings… > Audio > TX Input. The supported source choices are PC Mic, Radio Mic, and VAX TX (virtual device). Radio-specific controls appear only when supported. See Set up and transmit for the mic test, gain, TX ownership, and keying sequence.
If Linux audio will not open, Help > Diagnose audio backend is the available Linux-specific diagnostic. It reports backend information and provides a starting point for checking PipeWire or PulseAudio selection; it is not a general connection test. For broader link diagnosis, use Tools > Network Diagnostics after the radio or Core target has been selected.
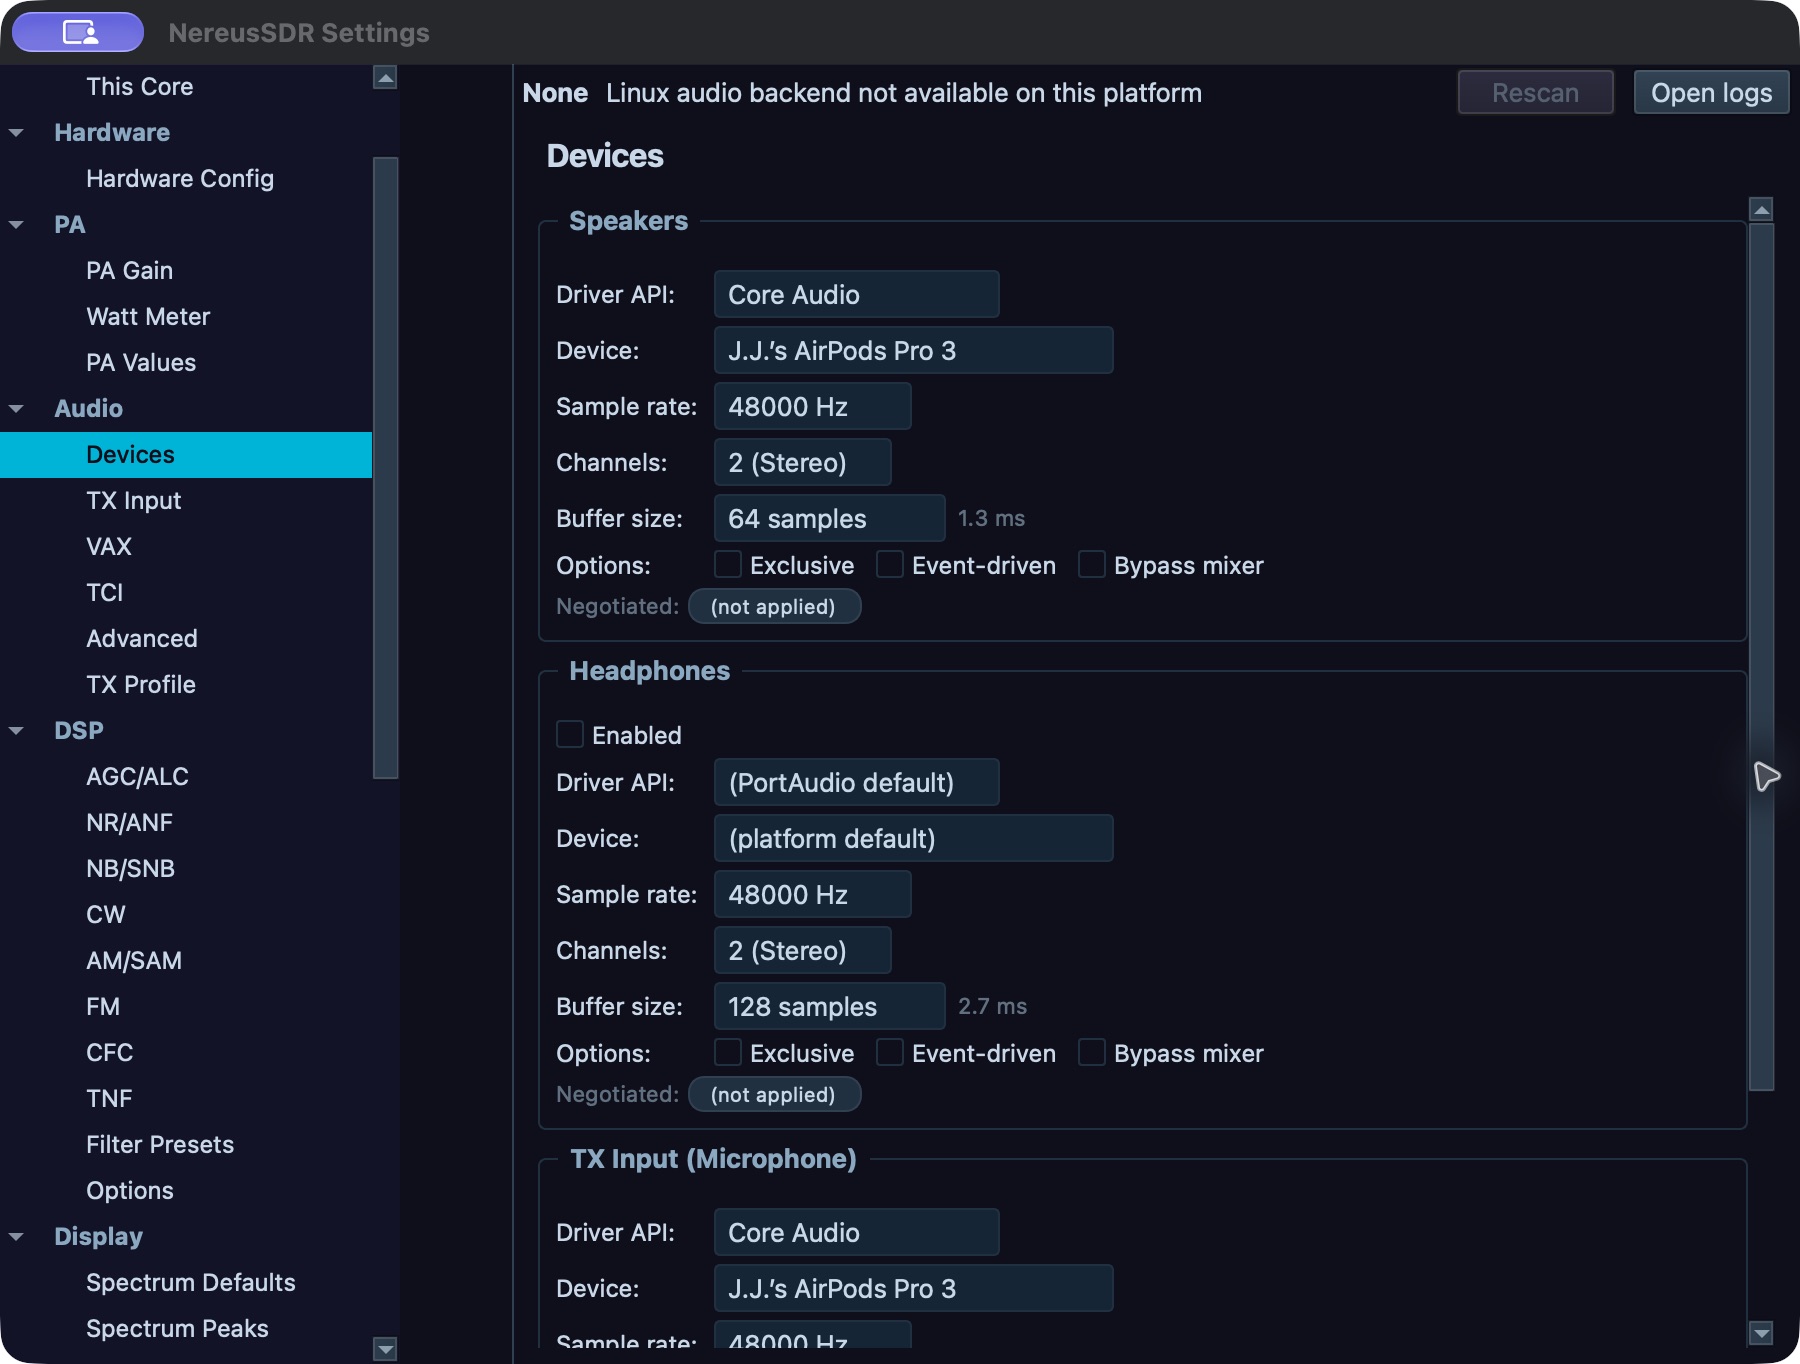
Audio Devices, desktop development build 0.5.2. Read each route separately: Speakers and Headphones are playback; TX Input is capture. The Negotiated fields in this image do not establish an open stream. The Linux backend strip is unavailable in this macOS capture. These are existing operator settings, not setup defaults.
Choose audio quality for this window's Core connection
Open File > Settings… > Cores > Audio with the Core, or use the matching
button in Your Cores > Overview. Check the heading naming this window's
Core; inspecting another saved Core does not redirect this page.
- Under Audio quality, choose High (48 kbps), Save data (24 kbps)
or Lossless when available. This preference is saved on this computer
and applies to received Core audio and this computer's microphone uplink.
Lossless needs about 1.6 Mbit/s and can fall back to Opus when the link
cannot carry it. The requested choice alone is not proof of the actual format.
- Read Receive from Core for the current format/health and the measured
Received audio payload rate. No measurement or an unavailable reason
means there is no current evidence to interpret as a working stream.
- Read Microphone to Core separately. Radio Mic at the station has
no microphone stream from this computer; see TX input.
Receiver audio for apps reports requested application streams, whose
compressed streams keep their separate 48 kbps target.
- If receive media failed while controls still work, use Retry audio when
enabled, wait for the health readback, then check local playback/mute and
actual receive sound. Changing an OS speaker device and retrying Core media
address different parts of the path.
Choose whether a saved target connects at startup
After successfully saving/connecting the intended target, open File >
Settings… > General > Startup & Preferences and set Auto-connect to last
radio. Read its tooltip to confirm which target it names. In a local window
it saves the last radio's launch choice; in a dedicated remote window it saves
the selected Core target's choice on this computer. It does not start a Core
service or change another computer's startup policy.
If the toggle is disabled, connect/save the target first and reopen the page;
the reason distinguishes a missing saved radio from a missing Core target.
Check the choice remains set when revisiting the page. On a later application
start, verify the connected identity before operating. If the saved target is
unreachable, use the normal Connections workflow to correct/reconnect it; the
startup flag does not repair a route. Clear the toggle to return to deliberate
connection at launch.
Recover a lost connection
When the link drops, inspect the title/status area and reopen Radio > Connections…. Read Current connection for the target and progress or failure detail. If a retry is already running, wait for its state to change. Use Radio > Connect to retry the last-used target in a normal window, or select the intended saved target in Manage Radios…. A stale radio IP is corrected with Edit…; a remote Core address or pairing issue is corrected in the Core target editor. If radio discovery is empty, verify the radio is powered, on the same reachable LAN/VLAN, then scan; for routed or VPN networks, use the saved/manual address rather than relying on broadcast discovery.
After reconnection, confirm the connected target again, then confirm a live panadapter trace and audible receive output. Shared Core settings and radio state may have changed while this client was away. Before transmitting, recheck the selected TX slice, transmit holder, microphone source, antenna, power, and the protection/readiness message as described in the transmit chapter. If the Core itself is reachable but its radio is not, the radio operator on that Core must restore the radio link; changing local playback devices will not repair the station connection.